Candy Corn Rice Krispie Treats
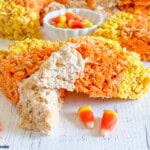
These Candy Corn Rice Krispie Treats are the perfect way to add a pop of color and fun to your fall festivities! With layers of yellow, orange, and white, they're as cute as they are delicious.
Servings 8
Calories 206kcal
Ingredients
Yellow Outer Ring
- 2½ cups Rice Krispies cereal
- 2⅓ cups mini marshmallows
- 2 Tablespoons salted butter
- Yellow gel food coloring
Orange Middle Ring
- 2 cups Rice Krispies cereal
- 1¾ cups mini marshmallows
- 1 Tablespoon salted butter
- Orange gel food coloring
White Center
- ¾ cup mini marshmallows
- 1 Tablespoon salted butter
Instructions
- Use butter or cooking spray to grease a 9-inch cake pan; set aside.
Prepare the Yellow Outer Ring
- Melt the marshmallows and butter in a saucepan over low heat, stirring regularly. Add yellow gel food coloring to reach your desired shade, remembering that the cereal will mute the color slightly. Opt for a more vibrant color to compensate. Stir in the cereal until fully incorporated. Press the mixture into a ring along the outer edge of your prepared cake pan, using your 6-inch ring as a guide.
Prepare the Orange Middle Ring
- Repeat the process from the previous step, but tint the mixture with orange gel food coloring. Use your small ring, reserve the center area for the final layer. Press it into the yellow ring so the layers will stay together when cut later.
Prepare the White Center Circle
- Repeat the process again, but leave the mixture untinted. Press the untinted mixture into the center area of your cake pan, pressing it together with the orange ring.
- Let cool completely. Cut into pie-shaped wedges to make candy corn-shaped Rice Krispie treats!
Notes
- Use fresh Rice Krispies cereal for the best results.
- Salted butter works wonderfully in Rice Krispies treats recipes, but unsalted is fine.
- When adding food coloring, remember that the cereal will slightly mute the color. Opt for a more vibrant color to compensate.
- Use a silicone spatula or buttered wooden spoon to gently stir the Rice Krispies cereal into the melted butter and marshmallows.
- If necessary, you can substitute a 9-inch cake pan. Keep in mind that the Rice Krispies Treats will be thinner, and the rings will appear larger, resulting in a slightly different appearance.
- When pressing the mixture into the pan, butter your hands (and the rings). Melted marshmallows are incredibly sticky!
- As you place the different mixtures in the pan, press them together so the layers won't separate when cut later.
- You can cut the treats into 6, 8, or 10 triangles. I cut mine into eighths because it's easy!
- Storage: Store in an airtight container or zip-top bag for 3 to 4 days. If layering the treats, place a sheet of parchment paper between layers. Treats can be individually wrapped in plastic wrap and frozen inside a freezer bag or freezer-safe container, but let them come to room temperature before serving.
Nutrition
Calories: 206kcal | Carbohydrates: 38g | Protein: 2g | Fat: 6g | Saturated Fat: 4g | Polyunsaturated Fat: 0.3g | Monounsaturated Fat: 2g | Trans Fat: 0.2g | Cholesterol: 15mg | Sodium: 152mg | Potassium: 23mg | Fiber: 0.1g | Sugar: 19g | Vitamin A: 1223IU | Vitamin C: 10mg | Calcium: 3mg | Iron: 5mg